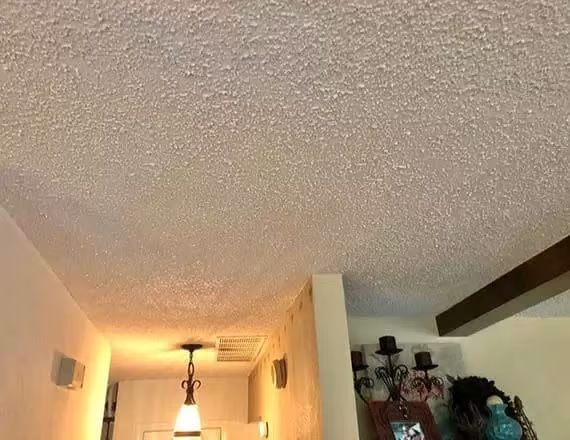
How To Repair Popcorn Texture Ceiling
Jason Lebeau
Jason is the owner of Mrwalls Drywall & Painting and has been a drywall contractor since 2001.
How To Repair Popcorn Texture Ceiling. Guide on repairing small holes or dents in popcorn textured ceilings. For homeowners or handyman that run into a small repair that they would like to handle without the expense of hiring a pro.
Popcorn ceilings also known as acoustic or textured ceilings were a staple in homes built from the 1950s through the 1980s. While they may be falling out of style, millions of homes still have them. Over time, small holes, dents, water stains, or cracks can appear, and you don't always need to call a professional to fix them. With the right materials and a little patience, you can repair small sections of popcorn texture yourself and save hundreds of dollars.
Before You Start: Important Safety Note
Homes built before 1980 may contain asbestos in their popcorn ceiling texture. If your home was built before 1980 and the texture has never been tested, do not scrape, sand, or disturb it without first having it tested by a certified asbestos inspector. You can purchase an asbestos test kit at most hardware stores, or hire a local professional to collect a sample. If asbestos is present, this repair is not a DIY project you'll need a licensed abatement contractor.
Tools and Materials You'll Need
- Popcorn ceiling texture spray can (available at Home Depot, Lowe's, or Amazon brands like Homax make pre-mixed cans)
- Joint compound (pre-mixed) lightweight or all-purpose
- 6-inch drywall knife
- 10-inch drywall knife
- Fine-grit sandpaper (120–150 grit)
- Utility knife
- Damp sponge or rag
- Painter's tape
- Drop cloth or plastic sheeting
- Dust mask and safety glasses
- Ceiling paint (flat or matte white) for blending
- Small paint roller or spray paint for touch-up
Step 1: Assess the Damage
Look at the area you need to repair. Small holes from picture hangers, nail pops, minor dents, or water-stained patches under one square foot are all great candidates for a DIY repair. If the damage is larger than a few square feet, has spread due to a persistent leak, or spans a seam in the drywall, you may want to consider hiring a professional for the best results.
Step 2: Prepare the Area
Cover the floor below the repair area with a drop cloth or plastic sheeting. Popcorn texture is messy and hard to clean off furniture and flooring. Use painter's tape to mask off any edges where the ceiling meets the wall if you're working close to a corner.
Put on your dust mask and safety glasses before you begin working.
Step 3: Clean and Smooth the Damaged Area
Use a damp sponge or rag to gently clean the damaged area. Remove any loose or crumbling texture around the edges of the hole or dent. If there are raised edges or flaking pieces, carefully trim them away with a utility knife. You want a relatively clean, stable surface to work with.
Tip: Don't over-wet the ceiling. A barely-damp sponge is all you need. Saturating the area can cause the surrounding texture to loosen and fall off.
Step 4: Fill the Hole or Dent with Joint Compound
Using your 6-inch drywall knife, apply a thin layer of joint compound into the damaged area. For small nail holes, one coat is usually enough. For larger dents or areas where texture has come off, you may need to apply two coats, allowing each coat to dry fully (usually 12–24 hours) before applying the next.
After the final coat is dry, lightly sand it with fine-grit sandpaper so it sits flush with the surrounding ceiling surface. Wipe away dust with a damp cloth.
Tip: Apply the compound slightly below the level of the surrounding popcorn texture you'll be building the texture back up in the next step, and you don't want the patch to bulge above the surface.
Step 5: Apply the Popcorn Texture
This is the step that makes or breaks your repair. You have a few options here:
Option A: Spray Can Texture (Recommended for Beginners)
Shake the can vigorously for at least two minutes. Hold the can 12-18 inches from the ceiling and spray in a steady, sweeping motion. Build up the texture gradually in thin layers rather than one heavy coat. Let each light pass dry for a few minutes before adding another. This gives you more control and helps you match the surrounding texture.
Tip: Practice spraying on a piece of cardboard or scrap drywall first. This helps you get a feel for the spray pattern and distance before you apply it to your ceiling.
Option B: Pre-Mixed Texture in a Pan
If you have a bucket of pre-mixed popcorn texture compound, you can apply it with a drywall knife or a texture brush. Dab and stipple the compound onto the repaired area, trying to mimic the pattern and depth of the existing texture. This method takes more practice to get a natural-looking match.
Tip: To blend the repair into the surrounding ceiling, extend the new texture about 2-3 inches beyond the edges of the patch area, gradually feathering it out. This prevents a hard line where the old and new texture meet.
Step 6: Let It Dry Completely
Allow the new popcorn texture to dry fully typically 8 to 24 hours depending on humidity and temperature. Resist the urge to touch or check on it, as you can leave fingerprints or flatten the texture before it sets.
Step 7: Paint to Match
Once the texture is completely dry, you'll likely need to paint the repaired area to match the rest of the ceiling. Most popcorn ceilings are painted with a flat or matte white ceiling paint. Use a small roller or spray paint to apply one or two light coats over the repair, blending into the surrounding area.
Tip: If your ceiling has yellowed over time (common in kitchens and bathrooms), painting just the patched area will make it stand out as a bright white spot. In that case, consider painting the entire ceiling for a uniform look.
Tips for Matching Existing Texture
- Look at the texture pattern closely. Popcorn textures vary some are fine and smooth, others are chunky and coarse. Match the spray can or compound to your existing pattern.
- Less is more. It's easier to add more texture than to remove excess. Build it up in thin layers.
- Stand back and compare. After each pass, step back a few feet and look at the repair from different angles. This helps you gauge whether you need more or less texture.
- Lighting matters. Check your repair under the room's normal lighting. Overhead lights and natural light can reveal imperfections that aren't visible up close.
Common Mistakes to Avoid
- Applying texture too thick. A heavy application will create a bump that stands out. Thin coats are the way to go.
- Not letting joint compound dry fully. Painting or texturing over wet compound will trap moisture, leading to cracking, peeling, or mold growth.
- Sanding too aggressively. You only need to smooth out ridges and high spots. Over-sanding creates a flat spot that won't match the surrounding texture.
- Ignoring the source of the damage. If a water stain caused the damage, fix the leak first. Painting over an active water stain will only lead to the problem returning.
- Skipping the drop cloth. Popcorn texture is extremely difficult to clean from carpet, hardwood, and furniture. Always protect your surfaces.
When to Call a Professional
DIY popcorn ceiling repair is great for small, isolated damage. But you should consider calling a professional if:
- The damaged area is larger than a few square feet
- There are multiple areas of damage across the ceiling
- The texture is crumbling or peeling in large sections
- You suspect asbestos or lead paint
- Water damage is widespread or the source hasn't been resolved
- You're not satisfied with your DIY repair and want an invisible patch
A professional popcorn ceiling repair service can respray an entire room or section so the texture matches perfectly something that's very difficult to achieve with spot repairs over larger areas.
Final Thoughts
Repairing small areas of popcorn ceiling texture is a manageable DIY project for most homeowners and handymen. The key is preparation, patience, and building up thin layers of texture rather than trying to get it perfect in one pass. With a $10–$15 can of texture spray and a little joint compound, you can make small holes and dents virtually disappear.
If you're in the Springfield, Massachusetts area and have a larger repair that's beyond a DIY fix or if you'd rather have a pro handle it the first time text or call us at (413) 302-0640. We offer free estimates and can have your popcorn ceiling looking like new. MrWalls Drywall & Painting